Thursday, June 27, 2013

SNEAK PEAK!!!!!

Here is a sneak peak of a few new items coming out in the Close To My Heart catalog effective August 1st! First off is the new Cricut cart! It is my favorite with everything from  borders, holidays, backrounds and HEXAGONS! Probably my favorite cartridge to date!


Also there is a jewelry line! I am not a jewelry fan but the accessories can be used on pages, albums, altered items, cards etc!
 
 
Also they have a few things for home such as this awesome item!
 
There will also be a whole system called Crush Booking. Sound familiar? Well same concept but the accessories and the books are so much cooler!!!! More posts to come as more items are shown from convention buddies!


Wednesday, June 26, 2013

Part Two of Chantilly Kit!

So the second part of Chantilly was really fun and VERY easy! You are to access the CTMH Reflections book item #9037 $14.95 to get exact directions.


The left side is Main Frame-Portrait page 61. Seriously easy page. You use White Daisy as a base, Twillight 8 1/2 x 12 and the patterned paper 1 1/2 x 12! Then you mat your photo! My photo was 6 x 10 so my mat was 6 1/2 x 10 1/2 on Buttercup.  I like that 1/4 inch on all four sides. I used some chocolate colored ribbon by another company to trim off the paper breaks. You will learn I love ribbon and have a TON of it! That was probably an understatement!
 
The peacock feathers are stamped with the exclusive stamp that comes with the kit. I stamped it in the matching ink color Twilight. Stamping the image in the same color as the paper gives it a watercolor look. I really enjoy that effect. The fabric covered buttons comes with the kit as well. I did add Bitty Sparkles Z2163 $2.95 and comes with 100. I like putting them on with a piercing tool which is part of the piercing tool kit Z114 $5.95. It helps with exact placement. Any piercing pointed tool should work. The stamp "Sweet Moments" was also done in Twilight with stamp C1467 Sweet Moments Flair. It is a beautiful stamp set and have used it a few times now. 
 
Here is the view of that.
 
The second page is also from Reflections Page 23 Title Topper-Cover with the same paper cuts. The sun was stamped with Buttercup with the exclusive stamp that came with the kit. I am going to use this stamp set a lot. I can already tell that! I inked the edges with the buttercup as well. The circles were 1 1/4 and 1 1/2 inches in Buttercup cardstock. I inked the larger circle with Buttercup around the edge. The smaller one was stamped with the circle stamp that came with the kit too! I tell you I love this stamp set! The inside was stamped with "every day is a play day" in Pear and also the same stamp set.
 
 
I decided to stamp onto the photos in Twilight also from the stamp set. The circle to the right of Alexis (my daughter's best friend) is stamped on White Daisy in Pear. I wrote the year inside. Again the fabric buttons came from the kit and the feather was stamped in Twilight.
 
I decided to do some hand journaling which I normally do not do. I am not a fan of my handwriting but like to do it every now and then. I just adore my daughter and her best friend Alexis. I hope their friendship continues for many many years!


Hope you enjoyed this! Please do not forget to follow my blog by clicking the button in the top right corner or by typing your email address in.
Please feel free to post any comments or questions. I would be happy to answer and/or reply.
 
Also remember that all these products that I highlighted can be seen at my Close To My Heart website www.brandie.ctmh.com !


Tuesday, June 25, 2013

Loving Chantilly Kit!!!!

OH MY GOSH! I am in <3 with Chantilly! I am now working on the layout kit. Only finished one double 12 x 12 layout out of two. This is item G1053 for $29.95. First off I have the best ever inspirations with my nephew Ryder and nieces Isabella "Izzy" and Emmalynn "Emilynn".
These pictures were taken in Spring so I could not use all the stamps that were suggested by the kit (that came in the kit). Many of the stamps were geared per summer not spring. That is ok! I have plenty of spring style stamp sets that worked great with my pictures.


This kit was MUCH easier in the sense of stamping. Very little was needed. Just a few phrases and then the circles. I need to work on doing those circles a bit more. LOL


So the stamps I used that were not in the kit are "Ok Smile" and "Note to self" as well as "Life is GOOD" which all came from an exclusive set CC1020"It's Your Day". I really think I need to order Cotton Candy ink stamp due to again this kit called for it but the Sorbet worked but I think the Cotton Candy would have been better. So here is the layouts and the close ups! Soon as I do the second layout of this kit I will post that as well. It looks ubber easy!


Now the close ups:


 ENJOY!


Monday, June 24, 2013

Birthday Album

We are friends with a couple who have adorable kids that we adore. One of the littles Leti just turned 1 today! For her older sister's first birthday I started what I call a "Birthday Album". The first page is a newborn picture and then a double layout for each birthday! So every year I do a double layout for Tori. I offered to do a similar album for Leti's birthday. Her party is Saturday and Hawaiian themed. So I get to take the pictures before I do that layout but wanted to do the first page layout to give as her gift.


I first started with the Close To My Heart paper pack X7163B Chantilly $9.95. I mounted the photos using the cardstock in the kit in Buttercup and Cotton Candy.
The patterned paper below the photo is the backround paper I chose that is also from the same kit.
 
 
The layout I chose was from the CTMH book Reflections. It was Page #28 Bottom Border Portrait as my inspiration of this adorable little girls book. So I used the Cotton Candy cardstock again as a base and cut it 6x12" and then used a different piece of the patterned paper that has a yellow fan design in buttercup in 3x12". I adhered it with my ATG gun to the top of the Cotton Candy 6x12" and then added a CTMH 1/4" stitched Hollyhock ribbon between the Cotton Candy and yellow pattern and the bottom of the Cotton Candy cardstock with ATG ribbon.


After that I decided to cut a 3" circle in the Buttercup. In the Cotton Candy, I used the exclusive alphabet from my Cricut E2, and cut out the letter "L". In Blush ink, from CTMH, I stamped "ETI" and then her real name "Charlet". I also used Liquid Pearls by Ranger Petal Pink and made dots on the border and highlighted it with Zig Wink Of Stella: glitter pens in GL Yellow #050.
 
 
I then put all of Leti's birth information on the Cotton Candy cardstock in Blush.
 
 
I had a dear scrapbook friend Kira Sorter make an adorable paper piercing and it looks just like Leti as an infant!
You can check out Kira's Facebook page at https://www.facebook.com/mytearbears. She has made lots of custom pieces for me including a gecko, my daughter in a softball uniform, tear bears for cheer and football and much much more!
 
I then popped up the paper piercing and the circle with the "L" up with foam squares. The photo and the photo mats were just adhered flat with my ATG adhesive.
 
So here is the layout!


Now I have to block her parents on FB from being able to read this! LOL! Hope you enjoyed Leti's first album page!


Sunday, June 23, 2013

Chantilly with NO Lace :)

So I finally got to work on another kit. I chose the card kit Chantilly from Close To My Heart. It is item #G1061 for $29.95. I loved loved loved the look of this kit due to the colors would work for both boys and girls but also adults and I would use the stamp set often!

There are lots of steps to this kit but when you really look at it...there is not. Close to My Heart breaks it up really well and very easily. I like doing all my cuts at once. Please follow the directions. You use your paper more wisely. It shows you and tells you. LOVE THAT! Also this kit only uses 4 pieces of paper and 15 card backs. 15 cards from 4 pieces of paper????? Yep you read right. One other suggestion...make sure you look at your card before you glue. LOL! You will see below. Hey I messed up but I think I covered well :)


So Here is what the kit will make:

 
Here are an example of each card:


Here is my Boo Boo card! I made the error twice!


I think I covered well. What do you think?
 
Now some may think $30 for 14 cards? If you go to any card making class that is the going rate for a card is $2 each. Now to boot you not only get the instructions to take home...BUT you also get the stamp with it!  I also now have on top of it one more extra piece of printed paper and white daisy cardstock. It also suggests you use certain ink pads. Well I did not have Sunset but I did have Smoothie and I love it with Smoothie! I think it POPS a bit more.
 
 
I have two more kits to do this week. You will find out on July 1st why I am all about the CTMH kits! A great special I will announce! Now til July 1st...any order placed on my web site www.brandie.ctmh.com will get a gift mailed to you. So happy shopping! Lots of clearance too!


Monday, June 17, 2013

Close To My Hearts Digital Scrapbooking with Studio J

I usually hate scrapbooking with a computer. Even to print something. LOL! Then CTMH came out with Studio J. OMG I love love love it! I did my daughters Senior album with it. A 5-Pack is $39.95 which includes shipping. You can stitch on your pages, change the direction of your pages, change paper, color your brads, ribbons, distress your pages, add titles, add stickers add almost anything you want! What I really love is that you do not need to buy anything upfront. You just go to my web site www.brandie.myctmh.com --> click Studio J --> upload your pictures --> pick the paper you like--> pick the layout you like--> HAVE FUN! You do not get charged until you want to order. Here are a few of the layouts I have done :)


Thursday, June 13, 2013

Combo of a Kit from Amiee Murphy and Close To My Heart Artiste!

I purchased the first kit produced by Amiee Sullivan Murphy from The Scrap Yard on Facebook. I love love love it! So much so I ordered the second one. I have barely used the kit. There is so much! I think I used some to make Father's Day cards! See the bottom of this post for those :) Here is her Blog http://murphycustomcreations.blogspot.com/ as well as her Facebook page https://www.facebook.com/pages/Murphy-Custom-Creations/283040184025.

Here is the picture of the kit:


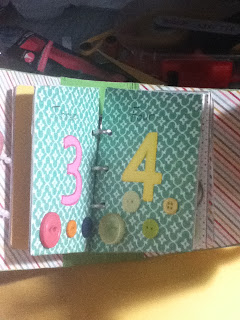
Here is the project I made using Artiste for the bow, numbers and Izzy's name. Also the buttons are random but many are the CTMH ones from years ago. I love going through my stash and using older stuff. I also took the circles and put CTMH Liquid Glass to make them 3D.


The glitter pens were purchased from Amiee as well for my Mother's Day present. Here they are:

Here are the Father's Day cards I made. Paper is from my awesome kit! The stamp is from Darcie's. The brown markers are older pigment CTMH markers. The greens, purples and reds are CTMH alcohol inks. They are amazing. I love the two nibs and the price is to die for! They are less than $6 for a set of two! The inside will have "HAPPY FATHER'S DAY"!


Hope you enjoyed this posting. I know it is a lot but it is what I am all about!